Difference between revisions of "Create neon sign text using photoshop cs"
(→Photoshop Magic) |
(Adding asins) |
||
| (One intermediate revision by the same user not shown) | |||
| Line 33: | Line 33: | ||
Right Click the text layer and choose "Rasterize Layer | Right Click the text layer and choose "Rasterize Layer | ||
[[image:NeonOpenTutorialfig3.jpg|thumb|300px|Fig 3]] | [[image:NeonOpenTutorialfig3.jpg|thumb|300px|Fig 3]] | ||
| + | |||
== Photoshop Magic == | == Photoshop Magic == | ||
| Line 50: | Line 51: | ||
{{adsense2}} | {{adsense2}} | ||
| + | |||
== Finishing touches == | == Finishing touches == | ||
| Line 61: | Line 63: | ||
There you have it one Neon Sign ala OpenTutorial | There you have it one Neon Sign ala OpenTutorial | ||
| + | |||
== Finished Product == | == Finished Product == | ||
| Line 74: | Line 77: | ||
== Bibliography == | == Bibliography == | ||
| − | * | + | * <asin a=0240519841>Adobe Bundle: Adobe Photoshop CS2 for Photographers: A professional image editor's guide to the creative use of Photoshop for the Macintosh and PC</asin> |
| − | * | + | * <asin a=1903450462>4x4 Photoshop and 3D: Geometry/Chaos </asin> |
| + | * <asin a=0135261783>Adobe Photoshop CC Classroom in a Book (2019 Release)</asin> | ||
| + | |||
| + | == Amazon's Related Products == | ||
| + | * <asin a=B07HKQDL7Y>Adobe Photoshop Elements 2019</asin> | ||
| + | * <asin a=B00VWCKJVA>Adobe Photoshop Lightroom 6</asin> | ||
| + | * <asin a=B076BBN8WF>Adobe Creative Cloud Photography plan with 1TB | 1 Year Subscription (PC Download)</asin> | ||
[[category:photoshop]] | [[category:photoshop]] | ||
Latest revision as of 07:12, 14 February 2019
How to create neon light text using photoshop cs Make your own neon sign without having to bend glass!
Contents
Setting the stage
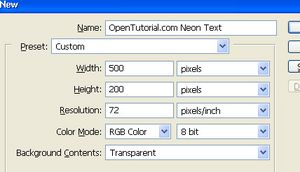
Click File/New...
In the "New" dialog window set the following:
(See Fig 1.)
- width: 500 pixels
- height: 200 pixels
- Resolutoion: 72 pixels/inch
- Background contents: Transparent
Set the foreground color to black by pressing "D" select the paintbucket tool and click on the layer. The background should now be black.
Placing the Text
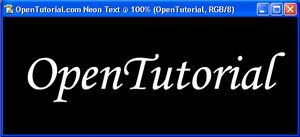
Click on the Type Tool (Horizontal type tool). Set the font to the following:
(see fig 2)
![]() Fig 2.
Fig 2.
- Font: Monotype Corsiva (or whatever you want)
- Size: 90pt
- Color: White
Type "OpenTutorial" in the layer. Use the hand tool to move the text to the center of the image.
Right Click the text layer and choose "Rasterize Layer
Photoshop Magic
With the text layer selected, Click Filter/Blur/Motion Blur...
In the "Motion Blur" dialog window set the following:
- Angle: 0
- Distance: 5
Apply the Following:
- Click ok to apply the blur.
- Click Layer/Merge Down
- Click Image/Adjustments/Invert.
- Click Filter/Stylize/Solarize
- Click Image/Adjustments/Auto Levels
Finishing touches
Click Image/Adjustments/"Hue/Saturation..."
In the Hue/Saturation dialog Window set the folloring:
- Colorize: Checked
- Hue: 270
- Saturation: 85
There you have it one Neon Sign ala OpenTutorial
Finished Product
See Also
- Make 3d images Using a standard digital camera and image editing software.
- Create a brushed metal texture using Photoshop CS Create a Brushed metal effect
Bibliography
- Adobe Bundle: Adobe Photoshop CS2 for Photographers: A professional image editor's guide to the creative use of Photoshop for the Macintosh and PC
- 4x4 Photoshop and 3D: Geometry/Chaos
- Adobe Photoshop CC Classroom in a Book (2019 Release)


